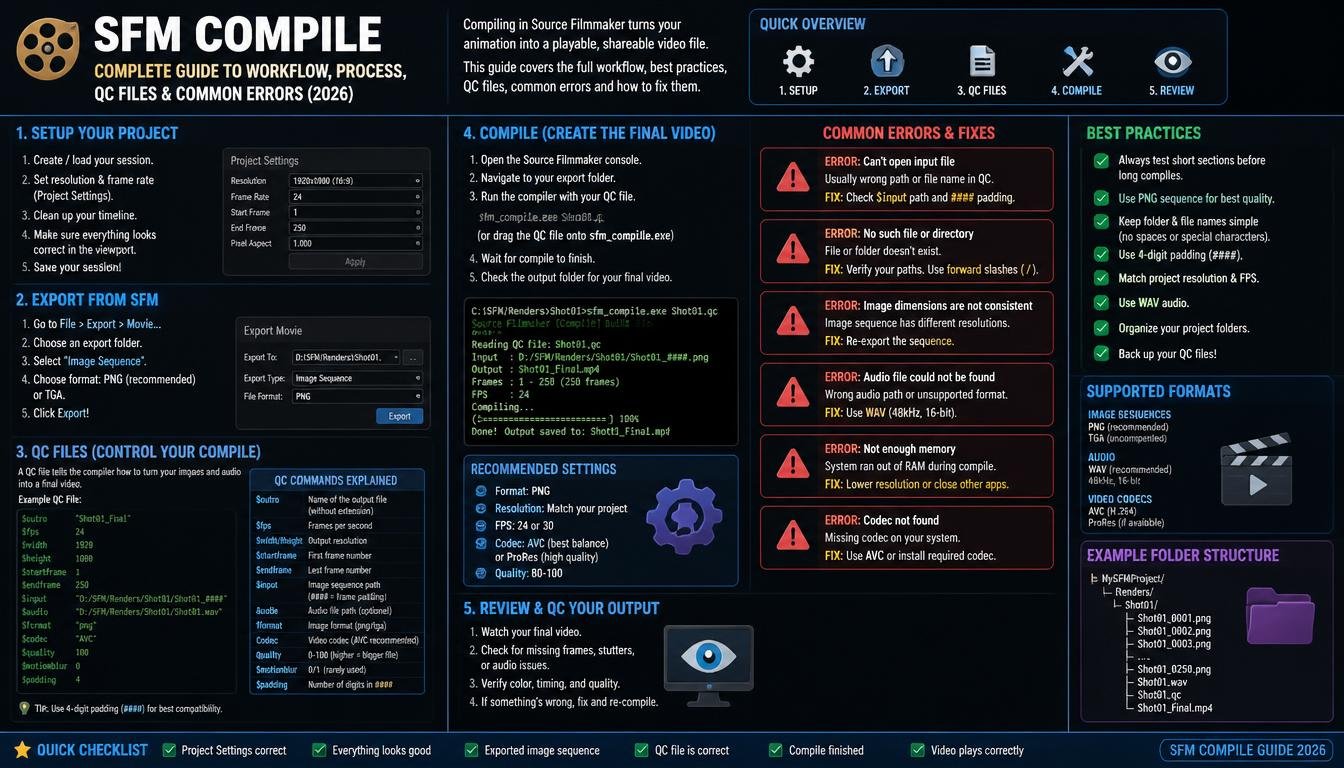
SFM Compile: Complete Guide to Workflow, Process, QC Files & Common Errors (2026)
Mastering the process of SFM compile workflows allows creators to bring custom assets into the Source Filmmaker engine effectively. Understanding how to bridge the gap between 3D modeling software and the Source engine is essential for anyone looking to expand their creative toolkit.
This overview provides the technical steps and organizational habits required to move models from your workspace into the virtual stage of Source Filmmaker. By refining your approach to asset preparation and data management, you ensure that your characters and props appear correctly in your animations without frustrating errors or broken textures.
What Is the Core Function of SFM Compile?
At its heart, the process of an SFM compile is the act of converting raw 3D data into a format the Source engine can read. The primary tool responsible for this transformation is Studiomdl, a command-line utility provided by Valve.
Without this step, your models remain locked in generic formats like .FBX or .OBJ that the engine simply ignores. Compilation translates your geometry, skeleton, and animation data into the proprietary .MDL format used by games like Team Fortress 2 and Half-Life 2.
The compilation process is not just about changing file extensions. It involves linking your 3D mesh to specific material files, defining collision physics, and establishing sequences for movement.
When you run a compile, the software checks your reference files against a script, usually a .QC file, which acts as a set of instructions for the engine. If the instructions are clear, the engine builds the final assets that you can then load directly into your scenes.
Preparing Your Files for Successful Compilation
Before you even touch the compilation tools, your source files must be perfectly organized. Most creators find that a messy directory structure is the leading cause of failed imports.
You should maintain a dedicated folder for each project that includes your reference meshes, your skeletal rig, and your high-resolution textures. By keeping these in a predictable hierarchy, you minimize the risk of the compiler losing track of your assets during the build process.
Your .QC file is the most critical piece of this organizational puzzle. This text file tells the compiler where to find your mesh, what materials to apply, and how the model should behave in the game world.
It is vital to use relative paths so that when you move your project to a different machine or folder, the compiler can still locate your assets. Clean, well-commented QC scripts are the hallmark of an efficient workflow, saving you hours of debugging later.
The Role of the QC Script in Asset Integration
The QC file functions as the brain of your compilation. It contains the commands that define the model’s properties, such as the scale of the mesh, the naming convention for animations, and the collision hull settings.
You can think of it as a recipe that tells the engine exactly how to assemble the various components you have created. Without a properly configured QC, the compiler will often throw errors or produce a broken model that appears invisible in the viewport.
When writing these scripts, you must pay attention to syntax. A single missing bracket or an incorrectly typed path will cause the entire build to fail.
Most advanced users keep a template QC file on hand to ensure they don’t miss essential commands like $modelname or $cdmaterials. Following a standard structure for your scripts makes troubleshooting significantly easier when you eventually encounter a model that refuses to render.
Managing Materials and Textures
Materials are often the most frustrating part of the compilation process. The Source engine relies on .VMT (Valve Material Type) and .VTF (Valve Texture Format) files to render surfaces.
If your QC file points to a material that doesn’t exist or is formatted incorrectly, your model will appear with the dreaded purple-and-black checkerboard pattern. Ensuring these files are correctly placed in your game’s material directory is non-negotiable for a successful build.
You must also consider the properties assigned to your materials. For example, a skin texture requires different shader parameters than a reflective metal surface.
Your VMT files define these properties, controlling how light interacts with your model through settings like bump mapping and specular highlights. Taking the time to properly configure these parameters ensures that your characters look realistic under the varied lighting conditions of your animation projects.
Troubleshooting Common Compilation Errors
Even experienced animators run into walls during the compilation phase. Common issues usually stem from pathing errors, incompatible vertex counts, or issues with skeletal weighting.
When the compiler fails, it typically outputs a log file detailing exactly where the process broke down. Reading this log is the most effective way to identify the culprit, as it often points to a specific line in your QC file or a missing asset.
| Error Type | Common Cause | Potential Fix |
|---|---|---|
| Model invisible | Incorrect material path | Verify VMT/VTF locations |
| Crash on load | Broken skeleton hierarchy | Rebind rig in 3D software |
| Missing textures | Incorrect VMT naming | Match VMT name to mesh material |
| Physics errors | Invalid collision hull | Simplify collision geometry |
If you find yourself stuck, look for common patterns in these errors. Often, a simple typo in the material path or a forgotten command in the QC file is the source of the problem. Don’t be discouraged by these setbacks, as they are a natural part of the learning curve for anyone working with custom engine assets.
The Importance of Skeletal Rigging
Rigging is the bridge between a static mesh and a moving character. When you perform an SFM compile, the compiler must map your bones to the engine’s requirements.
If your bone hierarchy is not set up correctly, your character will likely appear distorted or fail to move entirely. You must ensure that your skeleton is properly weighted and that the bone names match the requirements of the animation sequences you intend to use.
Many creators use pre-existing rigs from game assets as a baseline to ensure compatibility. This approach is highly recommended for beginners because it ensures that your custom model can use standard animations without requiring custom coding. By adhering to existing bone structures, you make your workflow faster and ensure your models remain versatile for future projects.
Best Practices for Workflow Efficiency
Efficiency in asset production comes down to iteration. You should aim to compile your models in small batches rather than waiting until the end of a massive project.
Testing your assets incrementally allows you to catch errors early, preventing the need for massive overhauls later. Keeping a log of your successful compilation commands can also save you time, as you can reuse these settings for future models.
- Maintain a consistent folder structure for all project assets.
- Use batch scripts to automate the execution of your compiler.
- Keep a copy of your working QC files for future reference.
- Test your materials in a simple scene before applying them to complex models.
- Always check your compiler logs for warnings, even if the build appears successful.
Adopting these habits will significantly reduce the time you spend debugging. By treating the compilation process as a structured part of your creative workflow, you gain more time to focus on the actual animation and storytelling aspects of your work.
Advanced Techniques for Professional Results
Once you master the basics, you can start exploring advanced features like flexes and procedural bones. Flexes allow for facial expressions, which are essential for creating expressive characters that truly come to life on screen.
These require specific setups in your 3D software and additional commands in your QC script. While this adds complexity, the payoff in character quality is immense and well worth the effort.
Procedural bones are another powerful tool that can handle natural movement like hair swaying or cloth flapping. Setting these up requires a deeper understanding of how the Source engine calculates physics and constraints. By experimenting with these features, you can take your animations to a professional level, making them stand out in a crowded space of content creators.
Frequently Asked Questions
Is SFM compile difficult for beginners?
The process has a steep learning curve due to the technical nature of command-line tools and script files. However, with a methodical approach and a solid understanding of your directory structure, it becomes much more manageable over time.
Do I need expensive software to create models?
You do not need expensive software, as many creators use free tools like Blender to build and rig their assets. The primary requirements are an understanding of 3D modeling fundamentals and the ability to export files that the Source compiler can interpret.
Why do my models appear with missing textures?
Missing textures usually occur when the engine cannot find the VMT or VTF files associated with the model. Double-check that your material paths in the QC file match the actual locations of your files on your hard drive.
Can I use custom animations with my compiled models?
Yes, you can include custom animation sequences in your QC file. As long as your model’s skeleton is compatible with the animation data, you can import and use any movement sequences you create or download.
How do I fix a model that is T-posing in the engine?
T-posing usually indicates that the animation data failed to compile or was not correctly linked to the model. Verify that your animation sequences are defined in the QC file and that the bone names match exactly between your model and your animation files.
The process of managing an SFM compile is a rewarding challenge that grants you complete control over your creative output. By understanding the relationship between your 3D assets, the QC script, and the Source engine’s material system, you unlock the ability to bring any character or object into your virtual world. While the initial setup may seem daunting, the consistency you build through careful file management and iterative testing will serve you well in every project you undertake.
Continue to experiment with new techniques, keep your project files tidy, and don’t be afraid to dive into the compiler logs when things don’t go as planned. Your path to creating professional-grade animations is paved with these technical milestones, so keep building and refining your craft.